If you use Bricks Builder and want to present company history, project milestones, product releases, events, or any other chronological content, you can now build your WordPress timeline directly inside the Bricks editing experience.
With Cool Timeline, you can add the dedicated Story Timeline element to a Bricks page and manage the timeline stories and styling controls directly from the Bricks builder.
In this guide, we’ll look at how the integration works, how to create your first WordPress timeline, and the different ways you can customize it.
Why Use Cool Timeline Inside Bricks Builder?
Traditionally, timeline plugins often rely on shortcodes. While using shortcodes to display a timeline is an easy option, it is not always the most convenient option when you are designing an entire page visually.
If your website is already built with Bricks, moving between a separate timeline interface and the page builder makes the workflow unnecessarily complicated.
But the Cool Timeline integration solves this by adding the timeline controls directly into Bricks Builder.
Apart from Bricks Builder integration, Cool Timeline also allows you to create and customize timelines using shortcodes and a dedicated gutenberg block.
How to Add Cool Timeline in Bricks Builder
Follow these steps to add your timeline to a page built inside Bricks Builder:
Add Story Timeline Widget
- Edit your page with Bricks Builder.
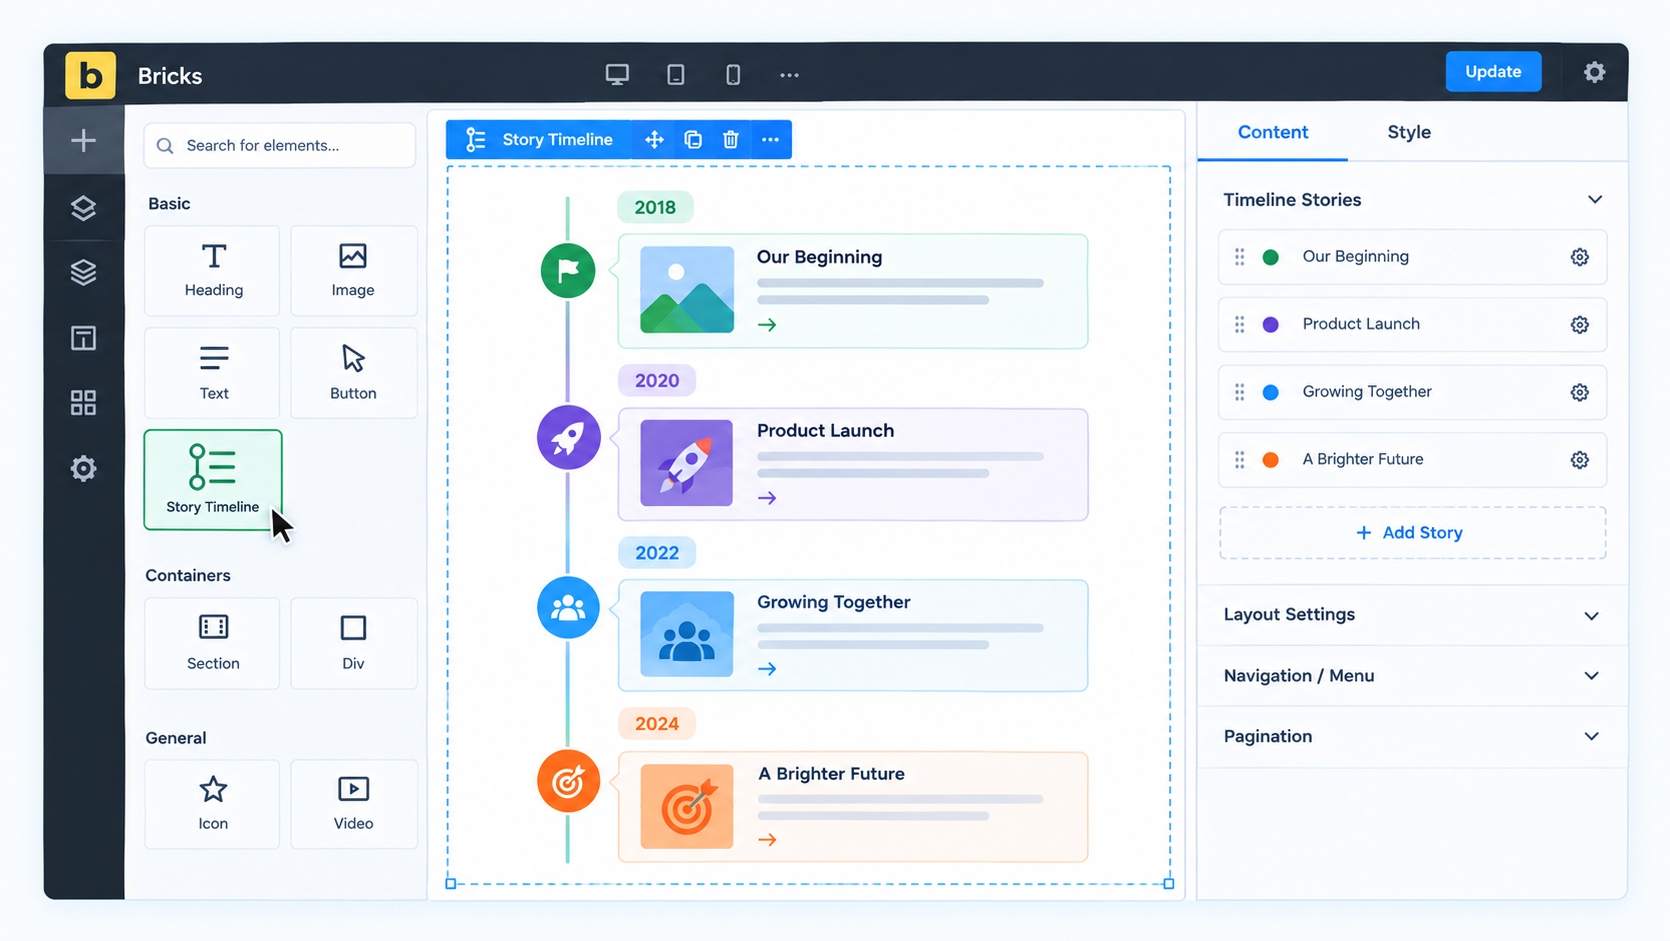
- Click the + button to add a new element.
- Search for Story Timeline.

- Drag and drop the Story Timeline element onto your page. Once added, you will see a default timeline structure appear on your page.
- You can now replace the default stories with your own content and customize the timeline using the settings available in the Content and Style tabs.

Content Settings
Under the Content tab, you will find the following settings:
- Timeline Stories
- Layout Settings
- Navigation / Menu
- Pagination
Timeline Stories Settings
The Timeline Stories section lets you customize the content of each timeline story individually using separate content and style settings.
Content Settings
- Open the Timeline Stories section.
- Click on the story you want to edit. Each timeline story includes the following options:

- Year / Label (Top): Enable this option to display a year or custom label above the story.
- Year / Label Text: Enter the year or label text for your timeline story. For example, 2000, 2020, or our Beginning.
- Label / Date: Add the main date, step, or label for the story.
- Sub Label: Add an additional label below the main date or label.
- Title: Enter the title of the timeline story.

- Choose Media: Choose whether to display an image, video, or slideshow for your timeline story, and set the media size to your preference.

- Description: Add the main content or description for the story.
- Icon Type: Choose the icon type for your timeline stories from icon, text, image, dot, or none.
- Read More Button: Enable the “Read More” link if you want to provide extra details or direct users to another page.
Style Settings
Customize the appearance of each timeline story individually using the Style tab.

- Background Color: Set the background color of the story content box.
- Border Color: Change the border color of the story box.
- Title Color: Set the color of the story title.
- Title Background: Set a background color for the story title.

- Description Color: Customize the color of the story description.
- Description Background: Set a background color for the description box.
- Label / Date Color: Change the color of the primary label or date.
- Sub Label Color: Set the color of the sub label.
- Icon Color: Customize the color of the story icon.
- Icon Background: Set the background color of the story icon.
- Year / Label Color: Change the color of the year or top label.
- Year / Label Background: Set a background color for the year or top label.
- Connector / Arrow Color: Customize the connector or arrow color for the selected story.
Add a New Story
To add more stories to your timeline:
- Open the Timeline Stories section.
- Click the + Add Story button.

- A new story will be added to the timeline.
- Enter the required content and customize its style using the available options.
Layout Settings
The Layout Settings section lets you control the layout, alignment, icons, connectors, media, and animation of your timeline.

- Layout: Choose the timeline layout from Vertical (Right / Left), Vertical (Right Only), or Vertical (Left Only).
- Preset Style: Select from multiple predefined timeline designs to change the visual appearance of your timeline.
- Initial Alignment: Choose whether the first story should appear on the Right or Left side when using the Vertical (Right / Left) layout.
- Content Alignment: Set the alignment of the timeline content to Left, Center, or Right.
- Icon / Labels Position: Adjust the position of the timeline icons and labels using the available control.
- Display Icons: Choose whether to display Icons, Dots, or None for the timeline story.
- Default Story Icon: Set a default icon that will be used for all stories.
- Connector Style: Choose the connector style between timeline stories from Arrow, Line, or None.
- Media Position: Choose whether the story media should appear Below Title or Below Description.
- Image Outside Box: Enable this option to display the story image outside the main content box.
- Content In Popup: Enable this option to display the story content inside a popup.
- Animation: Choose an animation effect for your timeline stories, such as Fade, Slide, Zoom, or Flip effects.
- Image Popup: Enable this option to open timeline images in a popup when visitors click on them.
Navigation/Menu Settings
Enable Navigation / Menu to create timeline navigation using the values entered in the Year / Label (Top) field of your stories.

- Navigation Style: Choose from the available navigation styles to change the appearance of the navigation menu.
- Navigation Position: Choose whether to display the navigation menu on the Left or Right side of the timeline.
Pagination Setting
- Enable this option to add pagination to your timeline.
- Story Per Page: Set the number of stories you want to display on each page.
- Page Text: Customize the text displayed for the current page.
- Of Text: Customize the text displayed between the current page and the total number of pages.
Style Settings
From the Style tab, you can customize fonts, colors, spacing, and padding for timeline elements.

- Line: Customize the appearance of the main timeline line, including its width, color, border, and filling.
- Icon Box / Dot: Customize the timeline icons or dots, including their size, color, background, border, radius, and spacing.
- Labels / Date / Year Box: Customize the appearance of the story labels, dates, sub labels, and year/label boxes, including their typography, colors, size, background, and spacing.
- Content Background / Border: Customize the background, border, spacing, radius, and shadow of the timeline story content box.
- Title / Description: Customize the typography, colors, background, spacing, and other styling options for story titles and descriptions.
- Image / Media: Customize the size, spacing, border, radius, and other styling options for images and other story media.
- Button [Read More]: Customize the appearance of the Read More button, including its typography, colors, background, spacing, border, and hover effects.
- Floating Effect: Add and customize a floating effect for the timeline elements to create a more dynamic appearance.
- After satisfied with the changes, publish your page and preview it.
Tips for Creating a Better WordPress Timeline
- A timeline becomes difficult to read when every story contains too much information. Keep each milestone focused on one important event.
- Use clear dates or labels so visitors can understand the timeline without reading every description.
- Images can add context, but they do not need to be included in every story. Use them where they genuinely help explain the milestone.
- For large timelines, consider using navigation or pagination instead of displaying dozens of stories in one continuous section.
- Finally, keep your timeline styling consistent with the rest of your Bricks page. The goal is for the timeline to feel like part of your website rather than a separate embedded component.
With the Story Timeline element, you can build the content, choose the layout, add media, set up navigation, apply animation, and style the entire timeline, all without leaving Bricks Builder.
More WordPress Timeline Plugins
If you use a different WordPress editor, you may prefer a timeline solution that fits into your existing workflow. Cool Plugins also offers timeline plugins for Elementor, Gutenberg, and Divi.
- Timeline Widget Pro for Elementor: Add a customizable timeline directly inside Elementor using a dedicated timeline widget. Choose layouts, add multimedia, and style your stories from the Elementor editor.
- Timeline Block Pro for Gutenberg: Build timelines directly inside the WordPress using dedicated timeline block. Add stories, choose a layout, and customize the timeline without relying on shortcodes.
- Timeline Module for Divi: Create interactive timelines inside Divi Builder using a dedicated timeline module and its design controls.