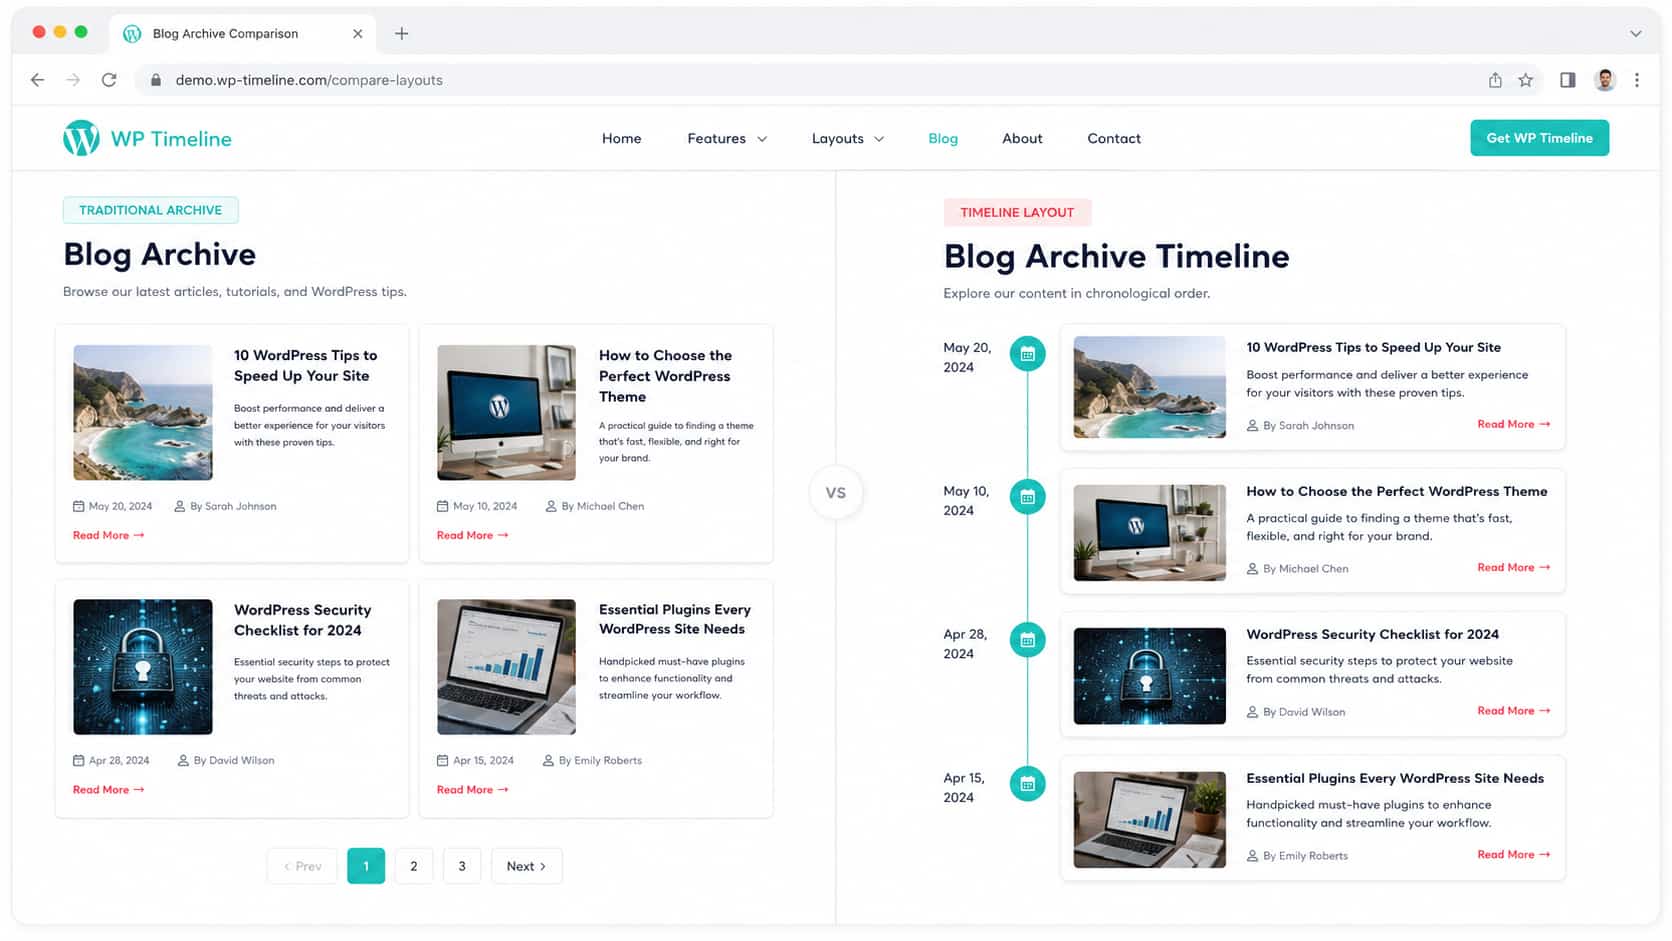
A regular WordPress blog usually displays posts in a list or grid. That works well when you only have a few articles, but it can become harder to explore when your website has years of content.
If you publish blog posts, company updates, product releases, news, or project milestones, a WordPress post timeline can be a better way to organize that content.
Instead of showing posts as a simple list, a post timeline arranges them chronologically. Visitors can follow your content from one point to another and quickly understand what happened over time.
In this guide, you’ll learn how to create a post timeline in WordPress using Cool Timeline. We’ll cover how to add a timeline with Gutenberg or the Classic Editor, create vertical and horizontal layouts, customize timeline settings, and control which posts appear.
What Is a Post Timeline in WordPress?
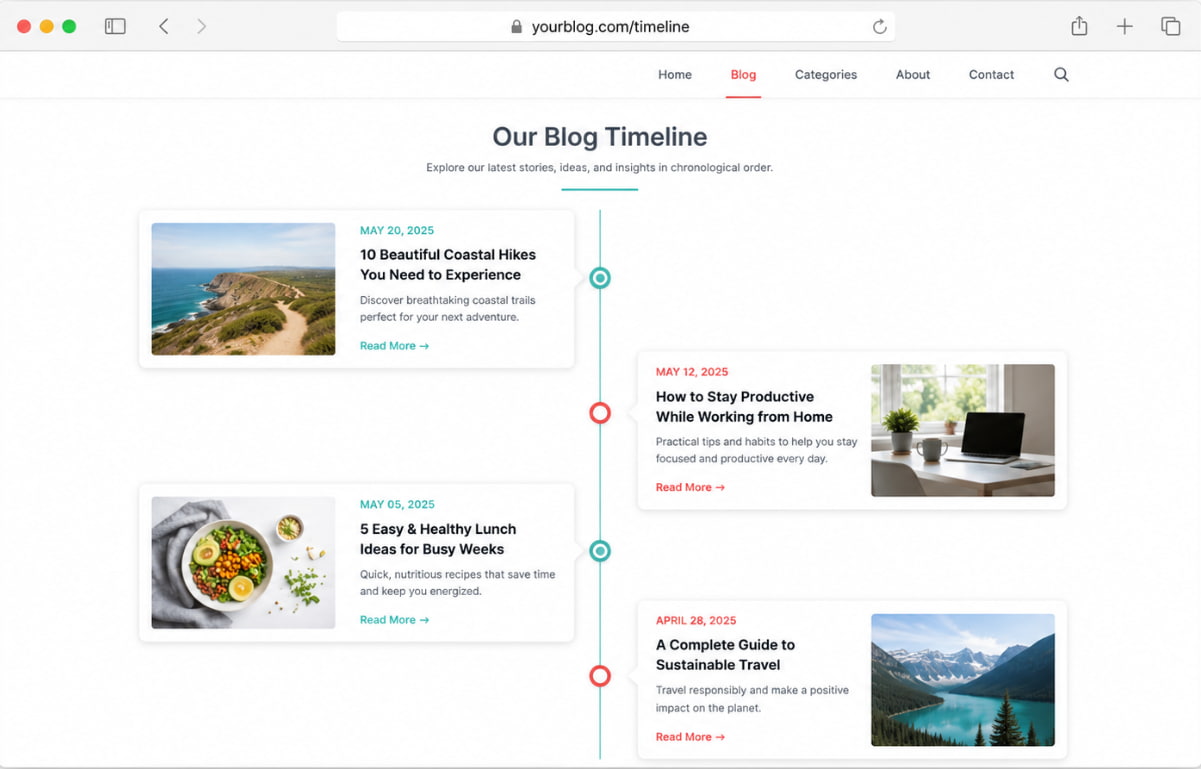
A post timeline is a visual timeline that displays your existing WordPress posts in chronological order.
Each post can appear as a timeline story with information such as:
- Post title
- Featured image
- Publication date
- Short description
- Read More link
- Post metadata
- Timeline icon
For example, suppose your company publishes regular updates about new products and features. Instead of placing all those articles in a standard blog archive, you could create a timeline showing:
Product Launch → New Feature → Version 2.0 → Major Update → New Product
This makes the content easier to follow and gives visitors a quick overview of your publishing history.
A post timeline can be displayed vertically or horizontally, depending on the layout you choose.
How to Create a Post Timeline in WordPress
The easiest way to create a post timeline is to use the Cool Timeline plugin.
You can add a Post Timeline using either the WordPress Classic Editor or Gutenberg.
The basic process is:
- Install and activate Cool Timeline.
- Open the page where you want to display the timeline.
- Add the Post Timeline.
- Choose your layout and design.
- Select which posts should appear.
- Customize the timeline settings.
- Publish the page and preview it.
Let’s look at both editor options.
How to Add a Post Timeline in the Classic Editor
If you’re using the WordPress Classic Editor, you can add the timeline directly from the editor toolbar.
Step 1: Open Your Page or Post
Open the page or post where you want to display the timeline.
You might create a dedicated page such as:
- Our Story
- Company History
- Blog Timeline
- Product Updates
Step 2: Click Add Timeline
In the Classic Editor toolbar, click the Add Timeline button.
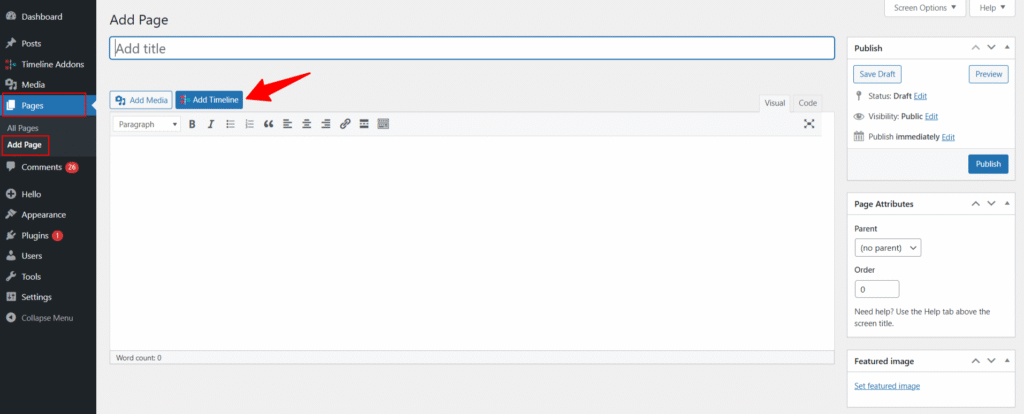
A popup with timeline settings will appear.
Step 3: Select Post Timeline
From the top selection box, choose Post Timeline.
This tells Cool Timeline to use your existing WordPress posts as timeline stories.
Step 4: Customize Your Timeline
Choose the layout, design, skin, categories, date settings, and other options you need.
Step 5: Insert the Shortcode
When you’re done with the settings, click Insert Shortcode.
The Post Timeline shortcode will be added to your page.
Step 6: Publish the Page
Publish or update the page and preview it on the front end.
Your WordPress posts should now appear as a timeline.
How to Add a Post Timeline in Gutenberg
If you’re using the Gutenberg Block Editor, you can add the timeline through the block inserter.
Step 1: Open the Gutenberg Editor
Open the page or post where you want to add the timeline.
Step 2: Click the Plus Button
Click the + Add Block button.
Step 3: Search for Timeline
Search for Timeline and select Post Timeline Shortcode.
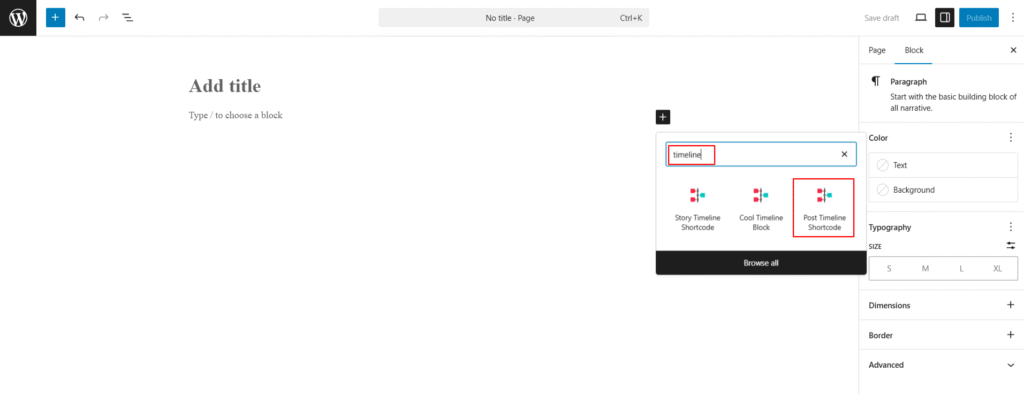
The timeline shortcode will be added to your page.
Step 4: Customize the Timeline
Configure the timeline according to your needs.
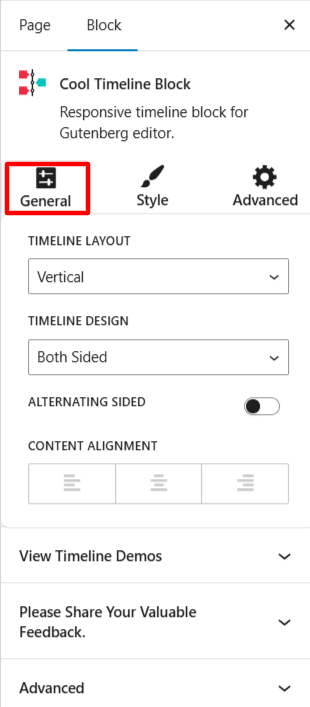
You can change the layout, posts, date format, content, filters, and other settings.
Step 5: Publish and Preview
Publish or update the page and preview the timeline on your website.
How to Create a Vertical and Horizontal Post Timeline in WordPress
Cool Timeline allows you to create both vertical and horizontal Post Timelines.
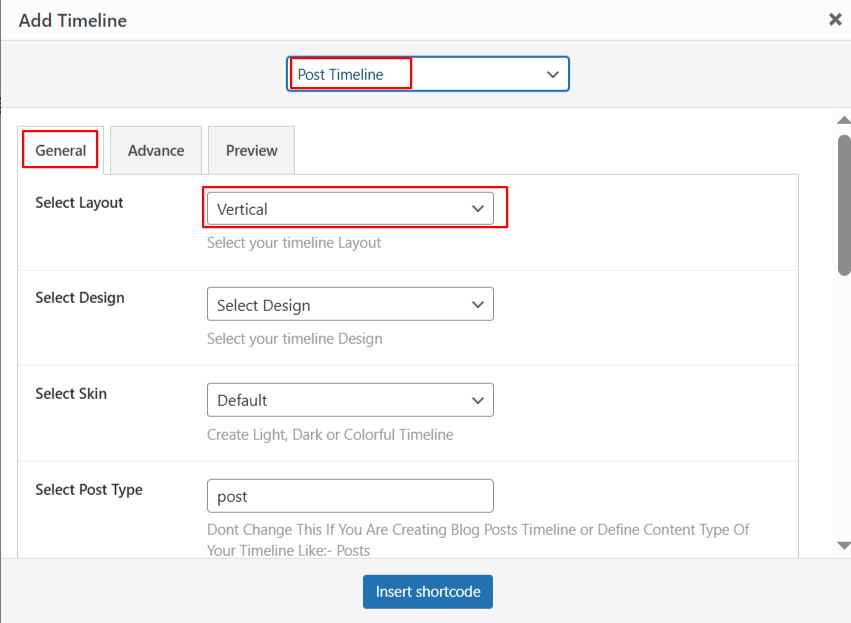
Most settings are shared between the two layouts, while the horizontal timeline provides additional options for controlling slideshow behavior.
After adding the Post Timeline through Gutenberg or the Classic Editor, you can configure the following settings.
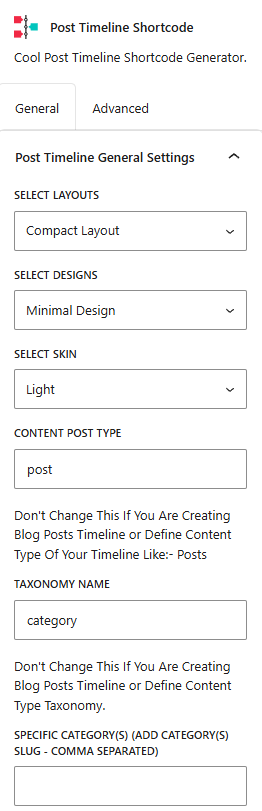
General Settings
Layout: Choose the timeline layout, such as vertical or horizontal.
Design: Select from the available timeline designs to change the visual appearance of your timeline stories.
Skin: Choose the visual style of your timeline, such as the default, light, dark, or colorful skin.
Post Type: Select the type of WordPress content you want to display in the timeline, such as posts.
Taxonomy: Choose the taxonomy used to organize and filter the content displayed in your timeline.
Specific Category: Select the specific categories whose posts you want to display in the timeline.
Specific Tags: Select specific tags to control which posts appear in the timeline.
Story Description: Choose whether to display a short summary or the full story content inside each timeline item.
Display Per Page: Set the number of timeline stories to display per page. If there are more stories than the selected number, pagination can be used to help visitors navigate the remaining stories.
Year Label: Show or hide year labels within the timeline.
Year Navigation: Show or hide year navigation so visitors can quickly move between different years.
Animation: Add entrance animation effects to make timeline stories appear smoothly as visitors scroll through the page.
Advanced Settings
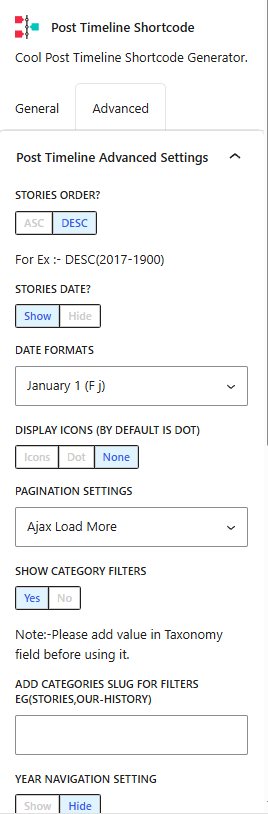
Stories Order: Choose the order in which timeline stories appear, such as ascending (ASC) or descending (DESC).
Stories Date: Choose whether the date should be displayed for each timeline story.
Date Format: Select the format used to display post dates.
Custom Date Format: Define your own date format when the available formats don’t meet your requirements.
Icons: Choose how timeline stories are represented, such as icons, dots, or no icon.
Pagination Settings: Configure pagination or load-more behavior for timelines containing many stories.
Category Filters: Enable or disable category filters so visitors can filter timeline stories.
Filter Categories: Select the categories that visitors can use when filtering the timeline.
Line Filling: Enable or disable the filling of the center line that connects timeline stories.
Display Read More: Choose whether to display a Read More link for each timeline story.
Content Length: Set how much post content should be displayed inside each timeline story.
Display Post Meta: Choose whether to show or hide post metadata.
Meta Key: Specify the metadata key when using post metadata.
Additional Settings for Horizontal Timeline
The horizontal timeline includes the same core General and Advanced Settings described above. It also provides additional options for controlling how stories move through the horizontal layout.
Autoplay: Enable autoplay to automatically move through timeline stories without requiring visitors to navigate manually.
Slideshow Speed: Set how quickly the timeline moves from one story to another when autoplay is enabled.
Starting Story: Choose which story the horizontal timeline should display first. For example, setting it to 2 starts the timeline with the second story.
After configuring the settings, insert the shortcode or update your page.
Preview the timeline on the front end to check the layout, posts, dates, filters, and other settings.
Your vertical or horizontal Post Timeline is now ready to display your WordPress posts in a visual and organized format.
Post Timeline Settings and Shortcode Attributes
If you need more control over your timeline, Cool Timeline also supports shortcode attributes.
A Post Timeline shortcode can define the content, layout, appearance, navigation, filtering, and post order.
See the Post Timeline in Action
Want to see how the shortcode translates into a real timeline? The example below shows a live Post Timeline created with Cool Timeline.
Learn how to create a step by step timeline in WordPress without writing any code. Follow simple instructions to add timeline stories, custom labels, and…
Read More
Cool Timeline lets you create WordPress timelines directly inside Bricks Builder using the dedicated Story Timeline element. Add the Story Timeline element from the +…
Read More
Learn why timeline-based milestone sections are more engaging than long text-based company history pages. Discover how Cool Timeline Pro helps you create professional milestone sections…
Read More
Cool Timeline supports multiple editors and builders — Create engaging vertical and horizontal timelines using Gutenberg blocks, shortcodes, Elementor, WPBakery, or the Classic Editor seamlessly.…
Read More
The timeline above is generated using the shortcode below. You can customize the shortcode attributes to control the layout, design, number of posts, dates, content, and post order.
Shortcode Used
[cool-content-timeline post-type="post" post-category="cool-timeline" tags="" story-content="short" taxonomy="category" layout="default" designs="design-2" skin="default" show-posts="4" order="DESC" icons="dot" animations="fade-up" date-format="default" pagination="off" filters="no" year-label="hide" post-meta="hide" content-length="25"]You can use this shortcode as a starting point and modify individual attributes to create a timeline that matches your website and content. The sections below explain what each shortcode attribute controls and how you can use it.
Post Timeline Shortcode Attributes
| Attribute | What It Controls | Available Options / Default Value |
| post-type | Selects the post type displayed in the timeline. | post |
| post-category | Selects the category used to display posts. | “” |
| taxonomy | Selects the taxonomy used to organize posts. | category |
| tags | Filters posts by tags. | “” |
| layout | Controls the timeline layout. | default, horizontal, one-side, compact |
| designs | Selects the timeline design. | design-1 to design-7 |
| skin | Controls the visual skin of the timeline. | default, dark, light |
| show-posts | Sets the number of posts displayed in the timeline. | 10 |
| story-border-radius | Controls the border radius of timeline stories. | 0 |
| icon-position | Controls the position of timeline icons. | “” |
| story-date | Shows or hides the story date. | show, hide |
| date-format | Controls how the story date is displayed. | F j, F j Y, Y-m-d, m/d/Y, d/m/Y, F j Y g:i A, Y, Custom |
| custom-date-format | Allows you to define a custom date format. | “” |
| icons | Controls the timeline icon style. | icons, dot, none |
| animation | Controls the animation effect applied to timeline stories. | none, zoom-in, fade, flip-right, zoom-out, fade-up, fade-down, fade-left, fade-right, and other available effects |
| story-content | Controls the amount of story content displayed. | short, full |
| compact-ele-pos | Controls the position of elements in the compact timeline. | main-date, main-title |
| pagination | Controls pagination behavior. | off, default, ajax_load_more |
| year-label | Shows or hides year labels. | show, hide |
| year-navigation | Shows or hides year navigation. | show, hide |
| navigation-position | Controls the position of timeline navigation. | “” |
| navigation-style | Controls the navigation style. | style-1 |
| filters | Enables or disables timeline filters. | no, yes |
| filter-categories | Defines the categories available for filtering. | “” |
| line-filling | Enables or disables timeline line filling. | true, false |
| read-more | Shows or hides the Read More link. | show, hide |
| content-length | Controls the amount of content displayed. | 50 |
| post-meta | Shows or hides post metadata. | show, hide |
| meta-key | Defines the metadata key when applicable. | “” |
| order | Controls the order in which posts are displayed. | ASC, DESC |
Note: Shortcode options and available values can vary between plugin versions. Check the current Cool Timeline documentation for the exact options supported by your installed version.
Example: Show More Posts
The show-posts attribute controls how many posts are displayed.
For example, the following displays 10 posts:
show-posts="10"To display 20 posts, change the value to:
show-posts="20"If your timeline contains a large number of posts, combine show-posts with pagination or load-more options to keep the page easier to browse.
Example: Change the Post Order
The order attribute controls the order in which timeline stories are displayed.
For example:
order="DESC"displays posts in descending order.
You can change it to:
order="ASC"to display posts in ascending order.
An ascending timeline can be useful for a company history, product journey, or project timeline where you want visitors to start with the earliest event and move forward.
How to Filter Posts in a WordPress Timeline
If your website has hundreds of posts, displaying everything in a single timeline may not provide the best browsing experience.
Instead, you can narrow down the content using categories and tags.
For example, suppose your blog contains these categories:
- WordPress Tutorials
- Product Updates
- Company News
- Case Studies
You could create a dedicated timeline for Product Updates instead of displaying every blog post.
This keeps the timeline focused and helps visitors find the content most relevant to them.
How to Customize the Post Timeline Date
Dates are one of the most important elements of a timeline because they help visitors understand when each story was published or when an event occurred.
The Post Timeline shortcode provides attributes for controlling date display.
For example:
story-date="show"displays the story date.
You can also change the date format using:
date-format="F j"The best date format depends on the type of timeline you’re creating.
For a company history timeline, a year-based presentation may work well. For a blog archive or news timeline, displaying the month and day can provide more context.
How to Add Filters to a Post Timeline
If your timeline contains posts from multiple categories, filters can make it easier for visitors to browse specific types of content.
The shortcode includes:
filters="no"You can enable filtering when you want visitors to filter timeline stories by category.
You can also use the filter-categories attribute to control which categories are available as filters.
This is especially useful for websites that publish different types of content, such as:
- Product updates
- Tutorials
- Company announcements
- Events
- News
How to Add Pagination to a Post Timeline
A timeline containing hundreds of stories can become difficult to browse if every post loads at once.
Pagination helps divide a large collection of posts into smaller sections.
The pagination attribute controls pagination behavior, while show-posts determines how many stories are displayed.
For example:
show-posts=”10″
limits the number of posts displayed at a time.
You can then use the available pagination or load-more option to help visitors access additional stories.
Vertical vs. Horizontal Post Timeline: Which Is Better?
There is no single layout that works for every website.
The best choice depends on the type, amount, and presentation of your content.
| Vertical Timeline | Horizontal Timeline |
| Stories move from top to bottom | Stories move from left to right |
| Good for long lists of posts | Good for highlighting key stories |
| Natural for normal page scrolling | More compact and interactive |
| Works well for blog archives | Works well for milestones |
| Suitable for larger collections | Useful for smaller collections |
| Better suited to longer descriptions | Works well for concise stories |
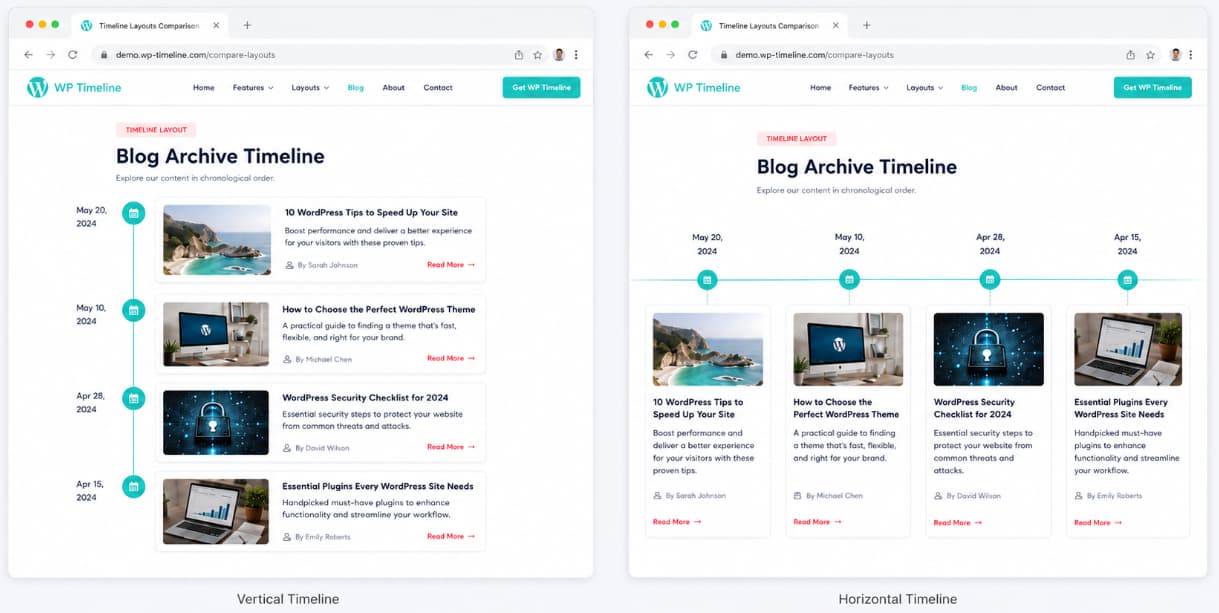
Choose a Vertical Timeline If:
- You have many posts.
- You want visitors to scroll naturally.
- You’re creating a blog archive.
- You’re showing a long company history.
- You want to display detailed post descriptions.
Choose a Horizontal Timeline If:
- You want a more compact layout.
- You’re highlighting important milestones.
- You have a smaller collection of stories.
- You want to use autoplay and slideshow controls.
- You prefer a left-to-right browsing experience.
Frequently Asked Questions
What is a post timeline in WordPress?
A post timeline is a visual way to display WordPress posts in chronological order. Instead of using a standard list or grid, each post appears as a story within a timeline.
How do I create a post timeline in WordPress?
You can use the Cool Timeline plugin to create a post timeline. Add the Post Timeline to a page using Gutenberg or the Classic Editor, select your layout, choose which posts to display, customize the settings, and publish the page.
Can I create a vertical post timeline in WordPress?
Yes. You can create a vertical post timeline and customize its design, skin, post categories, date format, icons, pagination, filters, content length, and other settings.
Can I create a horizontal post timeline in WordPress?
Yes. A horizontal post timeline displays stories from left to right and provides additional options such as autoplay, slideshow speed, and starting story.
Can I display posts from a specific category?
Yes. You can use the category and taxonomy settings to control which posts appear in your timeline.
Can I filter posts by tags?
Yes. The Post Timeline shortcode includes a tags attribute that can be used to filter timeline content by tags.
Can I show the newest posts first?
Yes. The order attribute controls the post order. For example, order=”DESC” displays posts in descending order.
Can I show older posts first?
Yes. You can use order=”ASC” to display posts in ascending order.
Can I customize the post date?
Yes. You can show or hide the date and customize its format using the timeline date settings.
Can I add pagination to a post timeline?
Yes. Pagination can help manage timelines that contain a large number of posts by dividing the content into smaller sections.
Can I add category filters?
Yes. You can enable timeline filters and specify the categories available for filtering.
Can I use a post timeline with Gutenberg?
Yes. Gutenberg users can search for Timeline and select the Post Timeline Shortcode block.
Can I use the Classic Editor?
Yes. The Classic Editor includes an Add Timeline button that allows you to select Post Timeline and insert the shortcode.
Final Thoughts
A WordPress post timeline is a simple way to turn a large collection of posts into a visual, chronological experience.
Instead of asking visitors to browse through page after page of blog posts, you can organize your content into a timeline that makes the relationship between your stories easier to understand.
With Cool Timeline, you can create both vertical and horizontal post timelines and control how they look and behave. You can choose which posts appear, filter content by category or tag, change the post order, customize dates, add pagination, enable filters, control story content, and customize other timeline settings.
Whether you want to build a WordPress blog timeline, company history, product release timeline, news timeline, or project milestone timeline, a post timeline can give your content a more organized and engaging presentation.